|
Why DIY?
Pressurized CO2 systems are an expensive investment. You may not be sure it will be worthwhile, and would like to try CO2 injection to see how it affects plant growth before spending the money for a pressurized system. Or maybe you have 3 tanks in 3 different rooms, which would require 3 pressurized systems. Perhaps you are on a student budget and just can't afford a commercial system. Or maybe you have a 10 gallon tank and figure a full CO2 system would be overkill.
For any of these reasons, a DIY CO2 setup would be worthwhile. It costs very little, can be set up in a single day, and only requires a few minutes of maintenance every few weeks. And the difference to your aquatic plants can be dramatic.
So How Does It Work?
A yeast culture is started in warm sugar-water inside a closed bottle with tubing leading into the aquarium. As the yeast begins to reproduce and metabolize, it uses the sugar for energy and begins to produce CO2 as a byproduct. The CO2 builds up a slight pressure inside the bottle and then exits through the tubing into the aquarium. Various diffusers and reactors can be used to disperse the CO2 throughout the tank. The yeast culture continues to produce CO2 until all the sugar is used or until the alcohol level in the bottle reaches toxic levels.
How Do I Set Up a System?
You will need a 2L soda bottle or similar-sized glass or plastic container with a screw cap which fits tightly, some standard airline tubing, and silicone glue or Plumber's Goop from the hardware store.
Drill or punch a hole into the bottle cap to the approximate size of the airline tubing. You can use a 1/4" electric drill or a heated nail or any other way you can devise to put a hole in the cap. Insert the tubing so that it extends 1/4" to 1/2" into the bottle cap. Glue the tubing to the cap on both inside and outside. Allow to dry overnight. At some point on the tubing, insert a check valve so that gas can exit the bottle but not return. This will prevent any siphoning from the tank into the bottle.
RECIPE: Using a funnel or rolled up paper, pour 2 cups of sugar into the bottle. Add 1/4 teaspoon of baker's yeast and a pinch of baking soda. Pour in a little warm water (NOT hot) and mix around to dissolve the sugar and yeast. Then fill to the shoulder (just above the label on a soda bottle) with warm water. Shake well and cap with the tubing-cap assembly. Run the other end of the tubing into the aquarium.
This setup will serve an aquarium in the 10-30 gallon range.
To disperse the bubbles, you can do any of the following:
- place the tubing into or under the intake to the canister, powerhead or power filter, allowing the filter impeller to disperse the bubbles. Caution - do not place the tubing in any high flow area which might create a vacuum in the tubing and collapse the culture bottle or siphon the culture into the tank!
- place an airstone on the end of the tubing and anchor in the aquarium.
- make a simple reactor. Plans can be found at http://www.thekrib.com/Plants/CO2/
Airstones and diffusion bells are less efficient than reactors and filter dispersal.
I've Seen Other Recipes Out There - Why Should I Use This One?
You can use any recipe that works for you. The above recipe is a good one because it provides enough sugar to fuel the yeast for several
weeks. In addition, it begins with a low population of yeast so that the culture will increase over a longer period of time and thus extend and modulate CO2 production. Adding more yeast will give a greater burst of initial CO2 output, but then the yeast will use up the sugar more quickly and die off more quickly. Using less sugar will decrease the overall lifespan of the culture. The baking soda helps to maintain pH and provide greater tolerance to the buildup of alcohol in the culture medium.
My Yeast Culture Isn't Producing Any CO2. Why?
Your yeast starter may be old. You can test its viability by adding a pinch of yeast to a little warm water. Wait 15 minutes or so. You should see some foaming on the water surface. If you don't, the yeast culture is too old and you will need to buy a new starter. Keep dry yeast in a closed container in the refrigerator when not in use.
You may have used overly-hot water to start the culture. Yeast likes very warm water but is killed by scalding water.
The room temperature may be too cold. Yeast growth will slow considerably in a cold room. If you cannot place the yeast bottle in a location which is warm (70 degrees F or more), you can keep the culture warm as follows. Place the bottle in a bucket. Add water to equal the level of liquid inside the bottle. Place a cheap aquarium heater ($7-10 from the department store) in the bucket and set it to maintain a comfortably warm temperature. This will keep your yeast growing at an even rate.
There may be a leak in the system. Check all connection points for leaks. Even a micro-leak can bleed out the CO2 before it reaches your aquarium. Use dishwashing liquid soap (you can cut it 1:1 with water if you wish, to spread thinner) smeared in a thin layer over all connection points to check for escaping air bubbles.
Be sure to minimize any water surface turbulence in the aquarium. Turbulence allows the CO2 you've injected to escape into the air. Minimizing turbulence will maximize CO2 levels in the water.
My Aquarium is Smaller/Larger Than 10-30 Gallons. Can I Still Use DIY CO2?
Yes. For a smaller aquarium, scale back the recipe and bottle size accordingly. For a 5.5 gallon tank, you could use a 1/2L bottle and reduce the recipe by 1/4.
For a larger aquarium (up to 50 gallons, at which point it may be worthwhile to invest in the pressurized system), several bottles can be combined into one system to produce sufficient CO2. Here is one method. Make 2 setups (2 bottles with drilled caps and airline tubing). Partway between bottle and tank, use a T-connector (found at the lfs - use a brass one to prevent cracking) to connect both lines from the bottles. From the T-connector, run a single line to the tank. This pools the amount of CO2 produced by both bottles, doubling the available amount. It is a good idea to place a check valve on each line entering the T-connector. This prevents back-siphoning, and allows you to change one bottle without losing CO2 from the other.
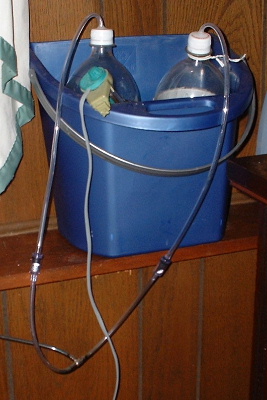
Here is what one of my setups looks like (note the bucket and heater, as
mentioned above, to maintain even temperature):
To maintain an even production of CO2, you can stagger the changing of these culture bottles - one every 2 weeks, or one every week, whatever you find to work for you.
Can I Add Anything to the Culture to Increase Production?
Some people have tried adding yeast nutrients or more sugar midway through the growth cycle. It is not a good idea to open the bottle once the yeast has begun to ferment!! The fermentation is an anaerobic process and opening the bottle will admit oxygen and stall the fermentation. The yeast will have to use up all the oxygen and then begin fermentation again. There is absolutely no reason to add anything more than is in the basic recipe. This should provide plenty of CO2. Addition of other nutrients at the beginning of the culture cycle can provide a growth medium for contaminating bacteria. This can have detrimental results for your tank. Sticking with the basic recipe and not interfering with the growth cycle will provide the best results.
What's This About Using Champagne Yeast?
"Champagne" and "Montrachet" yeasts can be purchased at brewing supply houses. These
yeasts have a higher tolerance for alcohol and given enough sugar should be able to continue
to ferment for longer than baker's yeast, perhaps as much as several months. If you want to
experiment with these yeasts, check with your local brewing supplier, and try adding an extra
cup or so of sugar to the water.
How Can I Be Sure My Tank pH Won't Crash?
It is most important to be certain that the aquarium water is well-buffered before adding CO2. The water should have a KH of 4 degrees or greater
(or 70 ppm CaCO3, if that is how your test kit measures) in order to be able to maintain a stable pH with CO2 addition. A lower KH could lead to a situation where the buffer is exhausted and the pH suddenly crashes to 4 or less, with lethal results for your fish and plants. If your tank KH is not high enough, you can easily increase the buffering by adding some crushed coral (from the saltwater tank supplies at the lfs) in a filter bag in your filter. This will slowly dissolve, releasing calcium carbonate which will increase your KH. You will also see a rise in pH (the two parameters are chemically associated), but the CO2 will drop the pH back down again. You will have to use trial and error to determine the exact amount of crushed coral to use in the filter bag for your tank.
Remember that after a large water change, the KH/pH can drop noticeably until
the crushed coral dissolves into the new water
How Do I
Know What Concentration of CO2 is in My Tank?
If you measure your pH and
KH, you can correlate them to arrive at an accurate reading of CO2 levels. The
correlation chart can be found at http://www.thekrib.com/Plants/CO2/kh-ph-co2-chart.html
, second chart on the page.
Is It Possible to Overdose With CO2? Will My Fish Suffocate?
It is not likely that you will overdose the tank with a DIY system. It just doesn't produce that much CO2. However, it is wise to monitor the pH and the reactions of the fish for the first few days. If the pH drops too low, you may not have enough buffering or you may be providing too much CO2 for the size of your tank. The plants should produce enough oxygen to provide plenty for your fish. However, if you should notice them gasping at the surface, particularly in the morning, the oxygen may have been depleted overnight and you will be wise to add an airstone at night to aerate the water. This is rarely necessary, but do monitor for it at first.
Early morning is the best time to check for pH changes, as it will be at its
lowest at this time. Note: CO2 does NOT displace O2 and cause suffocation. The two concentrations are
independent of one another.
Will This Really Work?
You bet! There are some beautiful planted tanks out there which use only DIY CO2. It's inexpensive, easy to set up and easy to maintain. You are sure to be pleased by the results!
Written by Cathy Hartland
|